Copyright Brush Tutorial by Deborah Boyet
Here is the Copyright Brush tutorial I promised. I can, and will make these brushes for others for a fee. You can email me if you are interested, but you should try this. I have put a lot of screen shot pictures with notes to help visualize the steps.
Please note that this is a copyrighted article. I do not mind sharing this article, please ask for permission to use it. Email requests to dboyet10@gmail.com Thank you.
First I need to say that I have only worked in CS3, so I am not sure about earlier versions working with the following, but it is likely similar with all of the Photoshop CS’s.
You can email me, and I can try and research the difference, if you can’t make it work.
A copyright is essential to protect your artwork. A brush with your signature trademark or whatever you want to use, and with the ability to adjust the transparency, and color is unique to your work, and in my opinion a great addition to your already beautiful piece of artwork. There are a lot of wonderful types free for download, and look really cool. I will list those sites at the bottom of this tutorial.
I will also cover in the next tutorial how to make an embossed watermark, either one works well, it just depends on your preference. Play with them both. You can find what you like, and develop new Photoshop skills…..and we artists in this day of computer and internet and newly developing ways to make art, can always use the additional skills.
Ok, here we go!
1. Go to File>New File, to create a new document. You will want to use a transparent background, but the size is not of importance. You can use the default. I tend to vary mine. Resolution only needs to be around 96 or so.
 2. Select the text tool and the font you want to use. You also want to select regular, italic or bold, if those options are available for that font. I have downloaded and used Bleeding Cowboys for one of mine. Choose your font size. I usually set mine to at least 72, so I can see how the lettering looks.
3. Now choose your font color. Black is a good default. You want to see how the lettering looks while you are making the brush, and you can change the color, and opacity when you use it.
2. Select the text tool and the font you want to use. You also want to select regular, italic or bold, if those options are available for that font. I have downloaded and used Bleeding Cowboys for one of mine. Choose your font size. I usually set mine to at least 72, so I can see how the lettering looks.
3. Now choose your font color. Black is a good default. You want to see how the lettering looks while you are making the brush, and you can change the color, and opacity when you use it.
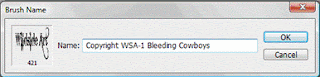
4. Next type what you want your brush to say (copyright, year, name, etc).
To use © symbol – Mac type Option+G
Windows – hold down the Alt key while pressing numbers 0169.
Note-you must use the numbers key not the numbers above the
keyboard. On a laptop you will have to access the onscreen
keyboard. It can be found in Start>Control Panel>Control
Panel Home>Appearance and Personalization>Ease of Access
Center>Start On-Screen Keyboard
5. Ctrl+click/ +click the text layer icon to select text. It is in the Layers panel on the right.


6. Select the brush tool and make sure the hardness setting is set on 100%.


7. From the menu at the top choose Edit>Define Brush Preset or whatever your similar Photoshop menu indicates.

8. Name your brush and click OK
 You did it! No need to save your document. Close it, and open a picture of your painting.
Now you can use your brush….here’s how.
Also, here are a few of the websites with 1000’s of free fonts for Windows and Mac users alike! You can donate with PayPal to the creator of the font if you like it and want to donate a few dollars.
You did it! No need to save your document. Close it, and open a picture of your painting.
Now you can use your brush….here’s how.
Also, here are a few of the websites with 1000’s of free fonts for Windows and Mac users alike! You can donate with PayPal to the creator of the font if you like it and want to donate a few dollars.
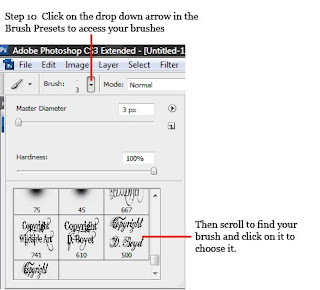
9. Select the brush tool from the tool bar menu on the right side of your screen
10. Go to the Brush Presets in the tool options bar. Choose the copyright tool you made.
It will likely be at the very bottom of the list.
 11. Next create a new layer in your document and then use your brush to paint your copyright in that layer. Using layers allows you to dump the layer if you make a mistake, and allows you to change the opacity, color, and size as you see fit by simply choosing in that layer.
See below for views and notes
IMPORTANT - Make sure to save the document as a new document or copy of the original. You should never alter the original, as you cannot undo any changes made, and you may want to do something else with the original photo at a later date.
11. Next create a new layer in your document and then use your brush to paint your copyright in that layer. Using layers allows you to dump the layer if you make a mistake, and allows you to change the opacity, color, and size as you see fit by simply choosing in that layer.
See below for views and notes
IMPORTANT - Make sure to save the document as a new document or copy of the original. You should never alter the original, as you cannot undo any changes made, and you may want to do something else with the original photo at a later date.
 11. Next create a new layer in your document and then use your brush to paint your copyright in that layer. Using layers allows you to dump the layer if you make a mistake, and allows you to change the opacity, color, and size as you see fit by simply choosing in that layer.
See below for views and notes
IMPORTANT - Make sure to save the document as a new document or copy of the original. You should never alter the original, as you cannot undo any changes made, and you may want to do something else with the original photo at a later date.
11. Next create a new layer in your document and then use your brush to paint your copyright in that layer. Using layers allows you to dump the layer if you make a mistake, and allows you to change the opacity, color, and size as you see fit by simply choosing in that layer.
See below for views and notes
IMPORTANT - Make sure to save the document as a new document or copy of the original. You should never alter the original, as you cannot undo any changes made, and you may want to do something else with the original photo at a later date. 
Figure 10 Choosing Colors


Figure 11. Make a New Layer

Figure 12 Change the Opacity of Your Brush

No comments:
Post a Comment